Wednesday, April 30, 2008

Moving Sale at eBay Store - Free Shipping on Orders Over $100

I don't talk too much about personal stuff on this blog, but as some of you know, my husband and I are on the verge of a big move (phase one was selling and moving out of our house last December, and moving to a temporary setup).  Phase two is moving out to California.  We have been looking forward to this for a while, and I am excited to say that our move is coming soon!

Therefore, I am throwing a big Moving Sale at my eBay Store - no point in hauling all of this on the moving truck!  I have over 100 items marked down.

Also, orders over $100 will get FREE SHIPPING!

The sale runs through May 9, 2008.  After this, the store will temporarily be closed for a few weeks as we move and get settled into our new place.  Not to worry - I will still be blogging throughout that time, and will continue to share tips and tutorials as well as feature some of my favorite fellow entrepreneurs and artists.

In fact, make sure to check in tomorrow - I will be sharing another "beyond the scrapbook page" project, and it is a fun one!

Friday, April 25, 2008

Weekly Scrapping Tutorial: Prima Paintables Layout

Watercolor-Pencils-Roxanne

I have always loved the idea of painting - artistic expression and all that.  But the truth is I'm a bit painting impaired. As in, I can't paint. Or draw. I'm afraid my drawing and painting skills are no better than they were when I was in preschool....

Luckily, the folks at Prima have a product that allows me to experience the satisfaction of painting without having to endure the embarrassment frustration I experience when painting freehand.  Their Paintables paper line has a variety of preprinted designs on textured watercolor paper.  You can use them plain, as a black and white patterned paper, or you can decorate them with paint, markers, glitter, etc.  Some people have told me they're a bit intimidated and unsure how to use the papers, so I decided to share my experimentation with it.

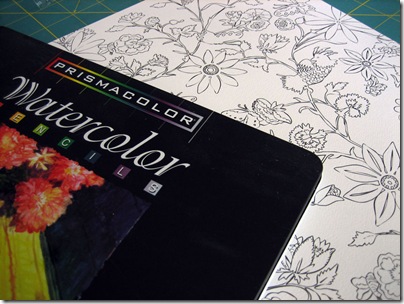
I decided to create a layout using the Roxanne paper from the line and dug out my long unused Prismacolor Watercolor Pencils.  To begin I picked out certain flowers I wanted to use and colored them in with the pencils.

Coloring-Roxanne

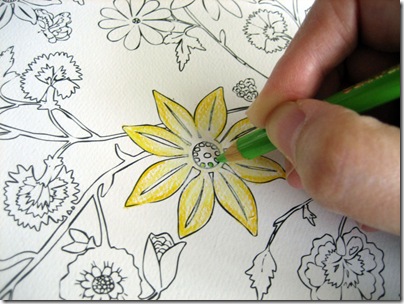
You can achieve color gradients by shading darker to lighter and you can also blend two colors (overlap part of the 1st color with the 2nd color, and blend out into the 2nd color) for more detail.  When finished coloring, I painted over the area with a small brush dipped in water.  To keep colors from muddying, rinse brush between colors.

Roxanne Painting

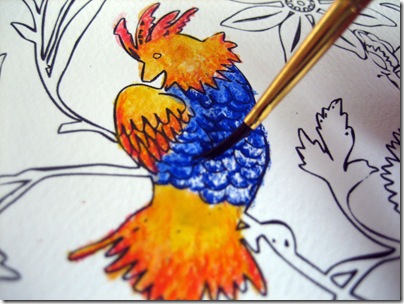
Note: Ultimately, I decided not to use the above bird in the layout, but included the photo to demonstrate painting with the wet brush.

I even experimented with some Glimmer Mist (a shimmery colored spray available in many hues) - after lightly "painting" the butterfly and letting it dry a bit, I cut it out and sprayed it with Glimmer Mist in Robins Egg a few times until I reached the color I wanted.

Glimmer-Mist-Butterfly

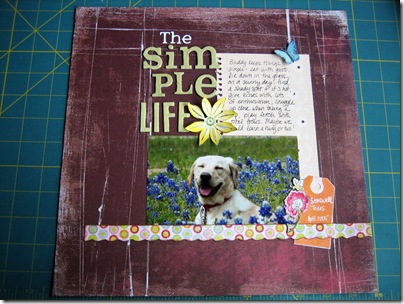
After cutting out the images I wanted from the paper, I used them as embellishments on my layout - I find that to be a great way to use papers that might be too busy or difficult to use as a whole sheet.  Also, if you mess something up, you don't ruin the whole layout!
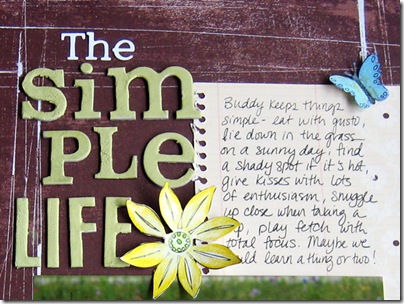
Simple-Life-Layout

A closeup shot:

Simple-Life-Closeup1

I was having such a good time painting, I also used Tim Holtz Distress Crackle Paint on the chipboard letters in the title.  I love that it comes with a brush inside the lid and it is an easy one step process, unlike traditional crackle mediums.

I found myself happily painting all morning - I will never be a fabulous painter, but with Prima's Paintables I can still enjoy myself and color & paint to my heart's content! 

You can find Paintables, Glimmer Mist, and Ranger Distress Crackle Paint in my eBay store.

Also, Prima's blog has a great Paintables Tips and Techniques entry that gives tips on even more ways of decorating Paintables.

Happy painting everyone!

Friday, April 11, 2008

Beyond the Scrapbook Page: Upcycled Magnetic Monograms

Lately I've been taken with the idea of inspiration boards, and the use of typography in home decor.  One afternoon while cleaning some scraps off my crafting table, I realized I had just what I needed amongst my bits of stuff to create some magnetic monograms for that magnetic inspiration board I keep saying I'm going to make.  

I have this habit of saving things I think I can make something out of later...little leftover scraps from my favorite scrapbook papers, bits of ribbon, paperboard jewelry boxes, and even the fridge magnets that realtors and pizza joints send!

For this project, I used the following supplies:

  • Promotional magnet with last year's calendar printed on it (any flat magnetic sheet will work)
  • 3 of the larger chipboard letters from my scrapbooking stash, and
  • Some bits of scrap paper.
  • Sanding block
  • Basic Grey Precision File Set
  • Adhesive
  • Craft knife or scissors

The basic process for making the letters is as follows:

  1. Sand the printed surface of the magnetic sheet to rough it up for better adhesion.
  2. Trace the letter (face up) onto the face of the magnetic sheet
  3. Cut the letter out from the magnetic sheet using a craft knife.  Cut inside the lines for best results.
  4. Apply adhesive to the back side of the letters. I used my ATG, making sure to go all the way to the edges, but a Xyron machine would work as well. I would not recommend a liquid glue, as it would probably slide around too much.
  5. Apply the face of the magnetic cut-out to the back of the letter.
  6. For the letters to be covered in patterned paper, turn the letters face down and trace onto the back of the paper.  Cut the traced letters out and adhere to the front of the chipboard letters.
  7. After adhering the paper, sand the excess off.  Basic Grey's Precision File Set is great because it has lots of small files to get in those little nooks and corners.
  8. The glittered A in the top right of the photo is actually from a Junkitz Chipboard Alpha set.  All I had to do for that one was to take the letter and adhere to the magnetic sheet (as described in steps 1-5).

And that's about all there is to it!  You could do tons of variations using different chipboard or grungeboard shapes, or even use a die cutting machine like a Sizzix to cut out both the magnets and the chipboard for your own custom shapes.  Hopefully I've sparked some ideas for your own home decor projects!

Tuesday, April 01, 2008

April Fool's Sale - One Day Only!

As I mentioned yesterday, I am having a big one day sale at my eBay store Scrap Fancy Boutique to celebrate April Fool's!

Find tons of items marked 40% off for one day only! On top of that, all you lucky blog readers are in for a treat - if you place an order, request a total through eBay, and type "GIFT401" and you'll get a free goodie with your purchase (good for purchases made April 1 only).

Don't miss this great opportunity to stock up on some great embellishments, clear stamps, and more - visit my store!