Wednesday, September 23, 2009

Hello Again. The Scrap Fancy Blog Returns! And a Sale to Welcome You Back.

I have been trying to write this post for some time now. What does one say when one has been blog-silent for so long?

My husband (and dog) and I moved from Texas to California over a year ago, so I took some time off from Scrap Fancy. In the interim I have been soaking up California living - enjoying the mild weather and being near the ocean, reconnecting with some old friends who've wound up out here, eating incredible food, working on learning to really cook, and it goes on and on.

While I have reopened my eBay store and have been doing some custom photo cards and custom scrapbook work, and have even started a Twitter account, the blog has remained quiet.

Well, I have missed it, so the blog is back! So keep tuned in - I'll be posting scrapbooking tips, featuring and reviewing products, keeping you up to date with Scrap Fancy news, and of course announcing sales and deals.

To celebrate the return of the blog, I am throwing a huge sale - over 100 items in my eBay store are marked down 50%, so check it out. Hurry because it only runs through September 30!

Thursday, May 22, 2008

Reducing Clutter: Take photos of and scrapbook your memorabilia

It has been a while since the last post – I truly didn't intend for it to be so long in between! We have been busy packing, and are up to our ears in boxes. Every day goes something like “wake up, sort through some belongings, pack some boxes, label boxes, shake head at how much stuff we still have despite our best efforts to pare down our belongings.” Lather, rinse, repeat. We are moving into a much smaller space than our suburban house, so we're having to make some tough choices about what stays and what goes. Today I thought I would write about reducing clutter since it's been at the front of my mind for weeks now.

I've realized that we keep things for many reasons beyond the practical or rational. We keep things even if they are not things we use or love. We keep items out of guilt, because they cost a lot or we were convinced it was a “must have” at the time. We guiltily keep objects that we've either inherited or received as gifts from loved ones even if they're not to our tastes. For many parents, the mountain of kids artwork is another example of guilty clutter.

In addition to streamlining my own belongings, I've been trying to convince my mother to part with some old cassette tapes that are taking up space in her house.  They are classical music tapes that relatives from overseas had sent us over 20 years ago. These are not the recordings of my brother and me (concerts, recorded music lessons, random talking) - those are going to be digitized so that we will have them in a form we can actually access and listen to - I don't even have a cassette player anymore!  But these tapes in question are just commercial recordings, without any real meaning to my brother or me. My mother however, associates these tapes with a specific time in life, and is reluctant to part with them.

Luckily, scrapbooking offers us a great solution: take pictures and scrapbook these items, and purge the clutter from our lives. Many times we are just holding on to the memories associated with these items, and we don't actually love the items themselves. Scrapbooking the story behind these items allows us to let them go.

Here are some tips for scrapbooking some common things we keep out of guilt:

Kids artwork: Decide on a certain number of special pieces to keep, with your kids' input. For the remaining artwork, tape it on the wall or set it on a table in a well lit room (natural light is best) and take pictures. Have kids help you write about what the artwork is about and when they made it.  Toss the artwork soon after, or the perceived importance of the item may keep building and it will become much harder to let them go!

Inherited objects: Again, don't toss anything you love that fits your tastes, but consider parting with the objects that you keep only out of guilt or attachment to the memories imbued in them.  Photograph anything you decide to part with, and make a layout (maybe with a photo of the loved one you inherited the items from) that captures the memories that you have of your loved ones with the objects in question.  Sell these items, and treat yourself to a new thing that you love (like a new piece of artwork or that great scrapbooking tool you've been eyeing).

I am hoping to keep these ideas in mind even after the move.  I'm loving the idea of simplifying and periodically culling out unnecessary or unloved objects from my life and making space for the things that I do love, use, and enjoy.  Hopefully this will also mean less hair pulling when it's time for the next move...
Thursday, May 01, 2008

Beyond the Scrapbook Page: Dome Bling Ring from Teresa Collins

As a self labeled scrapbooking fashionista (definitely with tongue-in-cheek), I find that a lot of inspiration and creativity comes from beyond the confines of scrapbooking.  I am inspired by design, decor, crafts, nature, etc. and I like to use scrapbooking products to create things other than scrapbook pages.

It's nice when someone else has the same thought. One of the new products to come from Teresa Collins at the last CHA trade show was these clear dome bling rings.  They are clear unadorned acrylic rings that come in sizes 7, 8, and 9. They are the perfect backdrop for adding your own creative embellishments and they make a unique style statement.


For my ring, I decided to use rub-ons to embellish the surface of the ring. Since the space to be decorated was small, I had to find some that had tiny images that would work well on the ring.  I found that the Imaginisce Rhinestones & Rub Ons sheets had coordinated designs in varying sizes, and the small sizes would work great on the dome ring - I wanted to preserve the cool effect of the clear ring and be able to see through the ring between the rub-ons - not have the entire surface covered.

To apply the rub-ons, I first cut out the desired designs from the sheet (a larger swirl, and a variety of small flowers and dots).  I found that putting the ring on my finger made it easier to position and apply the rub on so that the designs were placed where I wanted.  Using my fingernail to rub the backing sheet gave me more control in applying the rub-ons than the popsicle stick. I started with the swirl centered on the front, and then applied the flowers and dots all around.  The swirl was definitely the most challenging as it was the largest design, being applied to a contoured surface.  I just went with the flow if there was a mess-up and used some of the flowers and dots to cover up any cracks or imperfections. And here you can see the finished ring being worn:

Well, the ring is cute, but I am painfully reminded of why I am not a hand model.... I don't have the long slender fingers with the perfect nails like one of my girlfriends...I have stubby crafter's hands (which are probably ink stained on the palms)!  All in the name of art, right?

I have successfully test washed my hands with the ring on without losing the design, but in general, I would probably be gentle with it and take it off before doing anything dirty, rough and tumble, or wet.

I love that these rings are so affordable (just $1 each), so you can play and experiment and make lots of different ones. Anything that sticks well to a slick surface should work (Staz-on or alcohol inks, patterned paper adhered to the inside of the ring with diamond glaze, etc.).  The best part is that no one will have one just like yours!

Hope you enjoyed this latest installment of the "Beyond the Scrapbooking Page!"   If any of you have created a ring, I would love to see them!

Wednesday, April 30, 2008

Moving Sale at eBay Store - Free Shipping on Orders Over $100

I don't talk too much about personal stuff on this blog, but as some of you know, my husband and I are on the verge of a big move (phase one was selling and moving out of our house last December, and moving to a temporary setup).  Phase two is moving out to California.  We have been looking forward to this for a while, and I am excited to say that our move is coming soon!

Therefore, I am throwing a big Moving Sale at my eBay Store - no point in hauling all of this on the moving truck!  I have over 100 items marked down.

Also, orders over $100 will get FREE SHIPPING!

The sale runs through May 9, 2008.  After this, the store will temporarily be closed for a few weeks as we move and get settled into our new place.  Not to worry - I will still be blogging throughout that time, and will continue to share tips and tutorials as well as feature some of my favorite fellow entrepreneurs and artists.

In fact, make sure to check in tomorrow - I will be sharing another "beyond the scrapbook page" project, and it is a fun one!

Friday, April 25, 2008

Weekly Scrapping Tutorial: Prima Paintables Layout

Watercolor-Pencils-Roxanne

I have always loved the idea of painting - artistic expression and all that.  But the truth is I'm a bit painting impaired. As in, I can't paint. Or draw. I'm afraid my drawing and painting skills are no better than they were when I was in preschool....

Luckily, the folks at Prima have a product that allows me to experience the satisfaction of painting without having to endure the embarrassment frustration I experience when painting freehand.  Their Paintables paper line has a variety of preprinted designs on textured watercolor paper.  You can use them plain, as a black and white patterned paper, or you can decorate them with paint, markers, glitter, etc.  Some people have told me they're a bit intimidated and unsure how to use the papers, so I decided to share my experimentation with it.

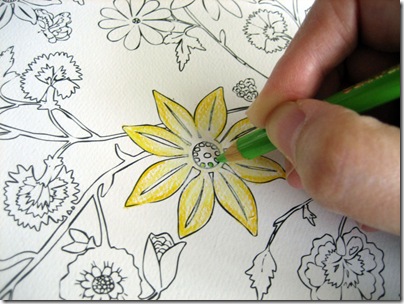
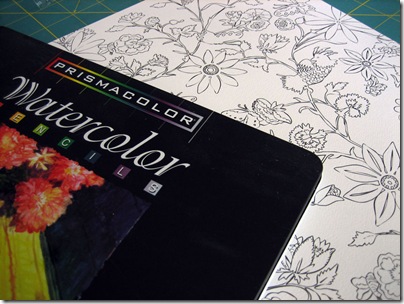
I decided to create a layout using the Roxanne paper from the line and dug out my long unused Prismacolor Watercolor Pencils.  To begin I picked out certain flowers I wanted to use and colored them in with the pencils.

Coloring-Roxanne

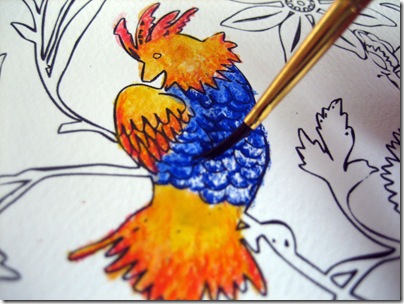
You can achieve color gradients by shading darker to lighter and you can also blend two colors (overlap part of the 1st color with the 2nd color, and blend out into the 2nd color) for more detail.  When finished coloring, I painted over the area with a small brush dipped in water.  To keep colors from muddying, rinse brush between colors.

Roxanne Painting

Note: Ultimately, I decided not to use the above bird in the layout, but included the photo to demonstrate painting with the wet brush.

I even experimented with some Glimmer Mist (a shimmery colored spray available in many hues) - after lightly "painting" the butterfly and letting it dry a bit, I cut it out and sprayed it with Glimmer Mist in Robins Egg a few times until I reached the color I wanted.

Glimmer-Mist-Butterfly

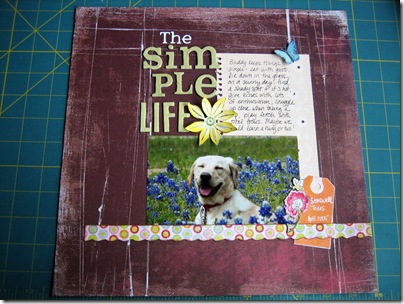
After cutting out the images I wanted from the paper, I used them as embellishments on my layout - I find that to be a great way to use papers that might be too busy or difficult to use as a whole sheet.  Also, if you mess something up, you don't ruin the whole layout!

Simple-Life-Layout

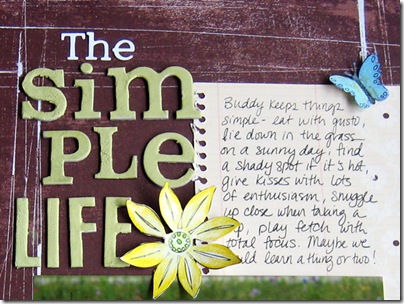
A closeup shot:

Simple-Life-Closeup1

I was having such a good time painting, I also used Tim Holtz Distress Crackle Paint on the chipboard letters in the title.  I love that it comes with a brush inside the lid and it is an easy one step process, unlike traditional crackle mediums.

I found myself happily painting all morning - I will never be a fabulous painter, but with Prima's Paintables I can still enjoy myself and color & paint to my heart's content! 

You can find Paintables, Glimmer Mist, and Ranger Distress Crackle Paint in my eBay store.

Also, Prima's blog has a great Paintables Tips and Techniques entry that gives tips on even more ways of decorating Paintables.

Happy painting everyone!

Friday, April 11, 2008

Beyond the Scrapbook Page: Upcycled Magnetic Monograms

Lately I've been taken with the idea of inspiration boards, and the use of typography in home decor.  One afternoon while cleaning some scraps off my crafting table, I realized I had just what I needed amongst my bits of stuff to create some magnetic monograms for that magnetic inspiration board I keep saying I'm going to make.  

I have this habit of saving things I think I can make something out of later...little leftover scraps from my favorite scrapbook papers, bits of ribbon, paperboard jewelry boxes, and even the fridge magnets that realtors and pizza joints send!

For this project, I used the following supplies:

  • Promotional magnet with last year's calendar printed on it (any flat magnetic sheet will work)
  • 3 of the larger chipboard letters from my scrapbooking stash, and
  • Some bits of scrap paper.
  • Sanding block
  • Basic Grey Precision File Set
  • Adhesive
  • Craft knife or scissors

The basic process for making the letters is as follows:

  1. Sand the printed surface of the magnetic sheet to rough it up for better adhesion.
  2. Trace the letter (face up) onto the face of the magnetic sheet
  3. Cut the letter out from the magnetic sheet using a craft knife.  Cut inside the lines for best results.
  4. Apply adhesive to the back side of the letters. I used my ATG, making sure to go all the way to the edges, but a Xyron machine would work as well. I would not recommend a liquid glue, as it would probably slide around too much.
  5. Apply the face of the magnetic cut-out to the back of the letter.
  6. For the letters to be covered in patterned paper, turn the letters face down and trace onto the back of the paper.  Cut the traced letters out and adhere to the front of the chipboard letters.
  7. After adhering the paper, sand the excess off.  Basic Grey's Precision File Set is great because it has lots of small files to get in those little nooks and corners.
  8. The glittered A in the top right of the photo is actually from a Junkitz Chipboard Alpha set.  All I had to do for that one was to take the letter and adhere to the magnetic sheet (as described in steps 1-5).

And that's about all there is to it!  You could do tons of variations using different chipboard or grungeboard shapes, or even use a die cutting machine like a Sizzix to cut out both the magnets and the chipboard for your own custom shapes.  Hopefully I've sparked some ideas for your own home decor projects!

Tuesday, April 01, 2008

April Fool's Sale - One Day Only!

As I mentioned yesterday, I am having a big one day sale at my eBay store Scrap Fancy Boutique to celebrate April Fool's!

Find tons of items marked 40% off for one day only! On top of that, all you lucky blog readers are in for a treat - if you place an order, request a total through eBay, and type "GIFT401" and you'll get a free goodie with your purchase (good for purchases made April 1 only).

Don't miss this great opportunity to stock up on some great embellishments, clear stamps, and more - visit my store!